A group of Black Hills area high school students participating in the 2016 Buffalo Challenge™ – The Next Generation of American Motorcycling are living proof that with the proper tools and instruction, anyone can gain the confidence and learn the necessary techniques to take on a major motorcycle customization project. These students are turning a stock 2015 Indian Chief Classic into an award-winning fully customized creation, and you can benefit from the cutting-edge techniques they’re picking up throughout the build. Follow along in your own garage as Chris Malo of Baggster teaches you the tips and techniques you need to customize your own Indian Chief Classic.
After its completion, the motorcycle from this how to will be up for grabs at the Sturgis Buffalo Chip’s annual Legends Ride®.
This blog will be updated weekly with new how tos and helpful tips, allowing you to work alongside the student mechanics participating in this program.
Step 1: Tear Down
The first step of the process is to strip down the bike of all body parts and front end, including the wheel, lower legs, forks, triple trees and handlebars. The bare bike frame is then left with the electrical and motor still in place.
Step 2: Installing Cams
Installing new oversized cams on any bike requires professional tools and expertise. After removing the cam cover and uninstalling the stock cams, the Buffalo Chip Challenge team watches Tom Keith from Sturgis Indian demonstrate the process.
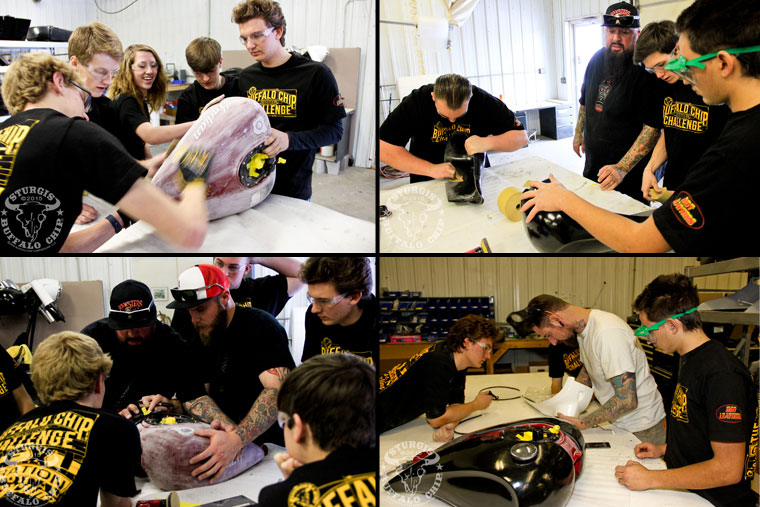
Step 3: Install Tank Stretch Kit
For this particular build, the team is installing a Dirty Bird Concepts Stampede Series Stretched Tank Kit. This kit is made from injection molded NYB Polymer, which makes it super strong yet easy to work with.
The install on this kit is very simple and will take you less than an hour:
- Scuff the current tank and the urethane shell with sandpaper to prep them for adhesive.
- Fit and mark pieces for final assembly.
- Apply panel bond to the urethane parts and smear it all the way around the inner edge of the shell in a 2 to 3 inch gutter from the edge.
- Apply parts to the tank.
- Clamp into place and leave to dry.
The Buffalo Chip Challenge installed a very similar kit in 2014. See the above steps demonstrated in this video.
Step 4: Mold and Install Additional Urethane Parts
If you’re working in your own garage, chances are you won’t have the opportunity to push molds for your own urethane body parts. But since it’s a process you wouldn’t normally get to witness, we’re giving you an inside look at how it works.
The Buffalo Chip Challenge student participants are fortunate enough to have access to Black Hills Urethane in Spearfish, SD through instructor Chris Malo, which allowed both Team Indian and Team Victory to see and participate in the injection mold process.
The process itself is proprietary to Black Hills Urethane, but you can get an idea of how it works by checking out this slideshow:

Step 5: Mock Up Body Parts
With the stretch tank kit in place, the next step is to begin mocking up the body parts. Team Indian starts with the rear fender, then moves to the bags and lids, and ends with the side panels. The front end on this particular bike isn’t done yet, so the mock-up will have to wait until the neck rake kit and front wheel is completed in order to continue.
Follow along with the body mock up process in this slideshow:
Note: Depending on your own customizations, your mock up may not follow this process exactly.
Step 6: Install Rear Air Ride
Step 7: Consult a Professional to Create a Custom Seat
A professional upholsterer can take your stock seat and transform it into a custom piece that fits seamlessly into the lines of your motorcycle’s body parts. While you’ll be able to communicate your ideas with the professional of your choosing, Team Indian was able to learn more about the process itself in a hands-on environment by tapping into local custom upholsterer Jeff Kreun of Kreun Kustom.
See how Team Indian’s custom seat came together in this slideshow:
Step 8: Install Neck Rake Kit
The next step is to install the neck rake kit. For this particular build Team Indian is using a KewlMetal Inc. bolt on neck kit. This complete kit puts a 36º total rake on a 2014 and up Indian frame so that a 26″ front wheel can be installed. Using this kind of kit will allow you to complete the whole process without any cutting, welding or repainting of the bike’s frame.
Watch the video below and get an idea of the process the students followed in removing the stock front end components and raking the frame of their custom Indian Chief.
Step 9: Final Mockup
Now that the front end is raked and together, the students will finish their body parts mock-up before sending the parts out to be painted. The main piece to be installed is the Stampede Series Drifter Fairing from Dirty Bird Concepts. This fairing is a bolt-on application and will be fully loaded with MTX Audio components when finished.
Follow along with this slideshow to see the students’ final steps before sending parts to be painted.
Step 10: Choose a Painter
Choosing the right painter is one of the most important decisions you’ll make when building a custom bike. That’s because the paint and graphics are what pull people’s attention from a distance, drawing them over to appreciate the rest of the details that make up your unique custom build.
Look for a painter with a clean preparation area to start the process and, if you’re looking to get things done in a hurry, a heated paint booth in order to bake the paint on faster between each of the steps. Talk to the painter to select the colors and graphics theme you’d like, but be prepared to allow your painter latitude to be creative as an artist.
Steps:
- Primer
- Sanding & Re-primer
- Two-stage paint = base + clear coat
Three stage paint = base (silver or gold) (flake or metallic) + transparent main color + clear coat.
All steps must be completed within 24 hours.
- If you are adding graphics, the painter must scuff the clear coat then tape off the theme design on the body parts. There may be multiple colors in the theme, so the painter must repeat each step.
This build was taken to Jamie’s Repair in Rapid City, SD, and all the paint for the project was donated by Sturdevant’s Auto Parts in Rapid City.
Step 11: Pinstriping & Graphics
Graphics are a great way to wake up your bike and add a custom touch you won’t find on any other motorcycle out there. For this build, the Buffalo Chip Challenge tapped local artist Tim Peterson of Flat Earth Art Company to hand paint custom graphics and do some hand pinstriping. Tim is one of a few artists still in existence who does all of their art and pinstriping work by hand.
Step into the studio with Tim to learn more about his craft:
Step 12: Final Assembly
The final step of any build project is to assemble the bike. During this phase Team Indian loads the audio into the inner fairing, adds latches to the bags and installs final details like bag liners.
Watch the video below to see Team Indian’s final assembly:
Step 13: Show the Bike
Taking your completed custom motorcycle to a show is a great way to see how your build stacks up compared to those of other builders and potentially get some recognition for all the hard work you’ve put in.
Days after completing this build, Team Indian took their Indian Chief Classic to compete at the Black Hills Motorcycle Show, where it won first place in the Full Custom Bagger – Indian Class.
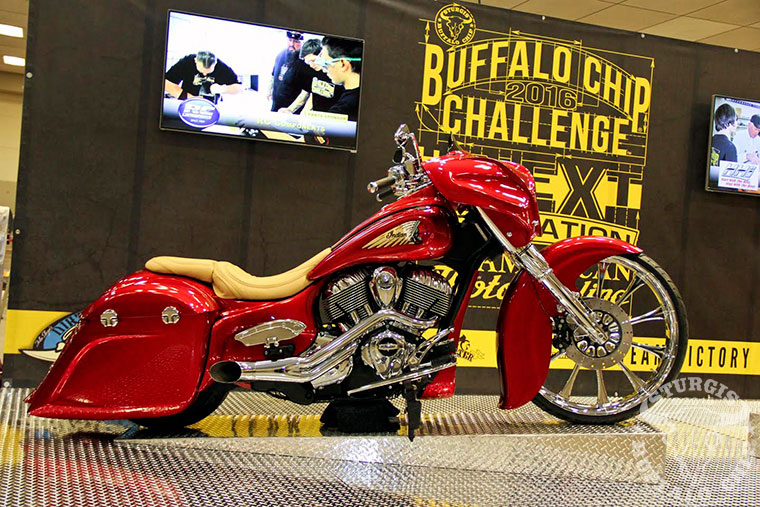
It then traveled to the renowned Donnie Smith Bike & Car Show, where it won first place in the All Makes (Full Custom) Class.
Don’t miss your chance to be part of the action when this award-winning custom motorcycle is auctioned in support of the Buffalo Chip’s signature Legends Ride® charity event on Deadwood’s Main Street on Monday, Aug. 8!
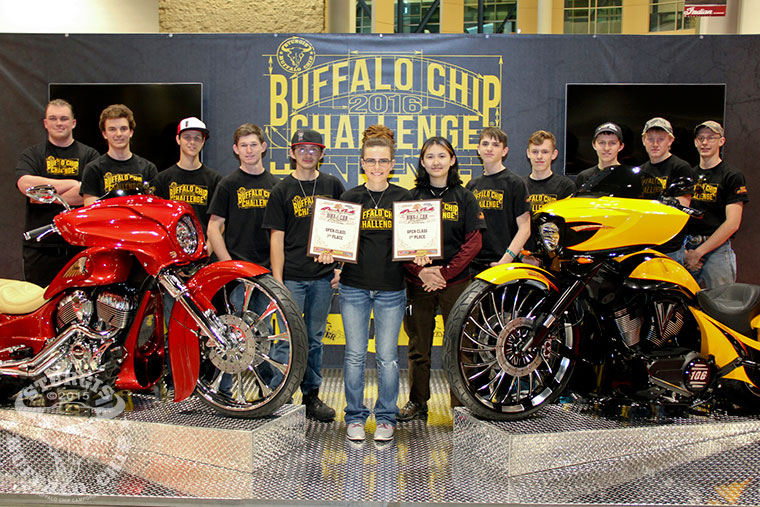
Meet the Team
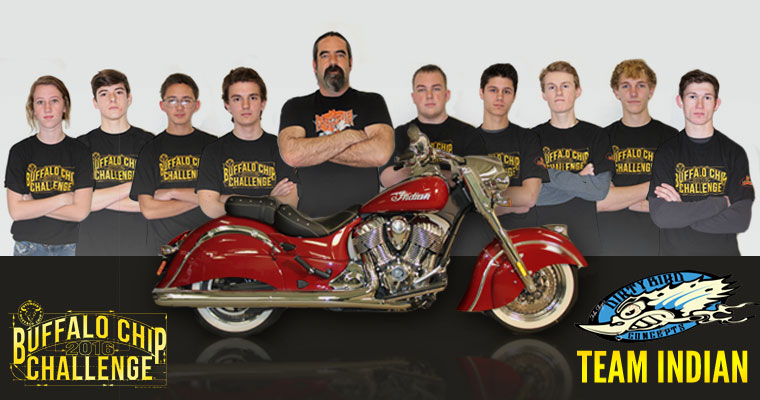
Under the direction of Chris Malo of Baggster (center), Team Indian (from left to right) is Faith Powers, Owen Servaty, David Mead, Calvin Tohm, Eli Beckdolt, Ryan Jones, Max Ellingsen, Logan Lucas and Taran Vollmer.
The Buffalo Chip Challenge is an industrial education and scholarship program that partners with leading industry professionals to provide students with skills and experience to put them a step ahead. Each year student teams work under the direction of Keith Terry of Terry Components, Randy Cramer of Dakota V-Twin and Chris Malo of Baggster to customize motorcycles that will go head to head with pro builders from around the country at the Donnie Smith Bike Show and be auctioned off in support of the Legends Ride® charity event. In addition to learning cutting-edge customization techniques, student participants are eligible to receive $8,500 in scholarships to continue their education. They are the next generation. Read more about the Buffalo Chip Challenge here.
Want more step-by-step customization how tos?
You can find out how Team Victory is customizing their 2016 Victory Cross Country by checking out Victory Cross Country: The Ultimate Customization Guide!Pulling off a motorcycle project of such massive proportions is a task that requires the efforts of many. Thank you to the following industry leaders for powering the 2016 Buffalo Chip Challenge:
Stakeholders:
Sturgis Buffalo Chip
American Iron Magazine
Baggster
Dakota V-Twin
Dirty Bird Concepts
Hot Leathers
Indian Motorcycle Sturgis
Rusty Jones Customs
Terry Components
Parts Sponsors:
Arlen Ness Enterprises
Carl Brouhard Designs
CT Designs
Flat Earth Art
Hawg Halters, Inc.
Jamie’s Repair
KewlMetal
Kreun Kustom
Legend Suspensions
Lloyd’z Motor Workz
MTX Audio
RC Components
Sturdevant’s Refinish Supply Center
Trask Performance
Vee Rubber America
0 Comments